Overview
This topic explains some advanced shipment features which are available for Endicia, FedEx Web Services and UPS Developer Kit.
Thermal Label Printing
As of version 3.5.0, we support generating thermal labels for Endicia (USPS), FedEx and UPS. This is an experimental feature. Due to the complexity involved, and the wide array of different printer makes and models, we cannot guarantee you will be able to print thermal labels with this feature. We have tested thermal label printing with a Zebra LP 2844 printer which uses the EPL format, and a Zebra GM400 printer using the ZPL label format.
You will find settings to turn on thermal printing on the settings pages and shipment creation forms for Endicia, FedEx and UPS. Check with the manufacturer of your printer to determine the proper label format for your printer.
How it Works
Thermal printing is handled via a Java applet called qz-print, accessed via your browser. You will need to have Java installed on your computer, along with the Java browser module for your browser.
Enabling Thermal Printing
- Enable Endicia, FedEx Web Services, and/or UPS Developer Kit.
- You will need to have your thermal printer connected to your computer, and properly installed. Configure the driver as follows:
Set Spool Format to Raw
Select Print directly to the printer - Open the settings page for the courier you wish to use with thermal printing
- Set the Label Image Type field to either ELTRON (for the EPL format) or Zebra (for the ZPL format), depending on your printer type.
- Enter the name of the printer in the Thermal Printer field.
- Set Label Stock to one of the "thermal" options that matches the stock you are using.
- Save changes
Importing the Applet Certificate
The free version of the qz-print applet is not signed. Because of this, you will get security prompts when using it. To prevent these from appearing, you can import the CSR file provided by qz-print.
-
Connect to your website via FTP.
- Navigate to this folder:
squirrelcart/lib/qz-print/qz-freecerts/
-
Download the qz-free.csr file to your computer.
-
Open the Java Control Panel on your computer.
- Click the Security tab:
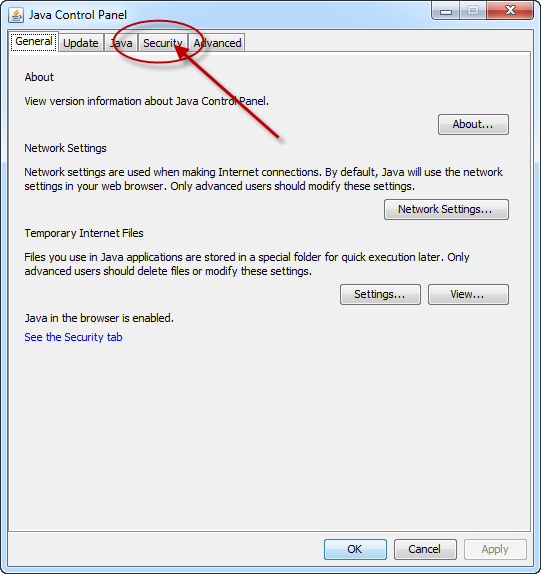
- Click Manage Certificates...

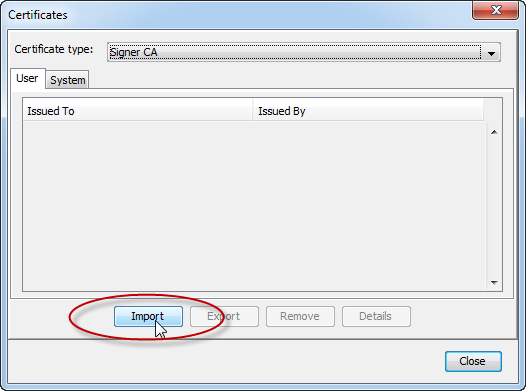
- Set Certificate Type to Signer CA:

- Click the Import button:
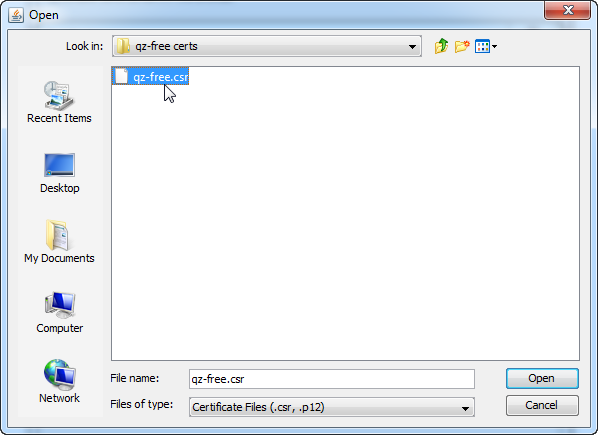
- Select the qz-free.csr file you saved to your computer in step 3, click Open, and apply changes.
Auto Creation of Shipping Labels
Squirrelcart supports auto creation of shipping labels at the time the customer places their order.
 |
You should always confirm the details of a shipment before passing it off to a courier. You can view the details of any auto created shipment by opening the corresponding shipment record in the control panel. |
Enabling Auto Creation
- Open the Settings page for the courier you wish to enable this for (currently only Endicia, FedEx and UPS are supported)
- Check the Auto Create Shipments checkbox field to turn on this feature
- Specify the value for the Acceptable Rate Difference field. While for most shipments the amount the customer pays should match your cost, it is possible for rate differences to occur. The Acceptable Rate Difference setting is used to specify a difference (as a percentage) which will be acceptable to you. When Squirrelcart attempts to auto create a shipment, if your cost is higher than what the customer paid but within the acceptable rate difference, the shipment will still be created. If your cost is higher, the shipment will not be created.
- Optionally, you can set a max cost using the Max Cost field, and disable international shipment auto creation by checking Domestic Only
Printing Labels
Shipments that were auto created will automatically be assigned an order status of Ship Label Ready. To print a label for an auto created shipment, click the label icon for that order in the orders table:![]()
You will be able to view the details regarding the shipment (weight, cost, etc...) on the subsequent page.
© 2001-2017 Lighthouse Development. All Rights Reserved.