Overview
In order to customize any of the design elements that make up a theme, you will need to create your own custom theme. This topic explains how to create a new theme. The advanced section of the documentation explains how to modify template and image files for your custom theme.
Creating a Custom Theme
- Choose a Name
Choose a name for your theme. This will be the name used in the Theme drop down box in the Account Options section of your storefront. For this example, we will use the name sunrise - Create Theme Folder
You will need to create a folder within the squirrelcart/themes folder to contain the theme elements that you will customize. We recommend that you name it similar to the name you chose, but using all lowercase characters. Also, be sure to avoid spaces and special characters. Use your FTP client to create your custom theme folder, and leave it open for the next step.
- Create Theme Images Folder
Inside the folder you just created, create a folder named images, which will be used to store any images specific to this theme:
- Assign Permissions
In order for Squirrelcart to be able to work with your theme's images folder, you *may* need to assign it permissions. PHP is going to need access to write to the folder you created in step #3 in order for you to upload theme images via the control panel. Your web host can tell you for sure whether or not setting permissions is needed. If it is, you will need to use your FTP client, and assign the images folder you created in setp 3 above permissions of 777. Use the "Installation : Setting File Permissions" topic as a guide.

DO NOT alter the default permissions that are associated with the custom theme folder you created in step #2 (shown in the example above as sunrise). - View Themes in Control Panel
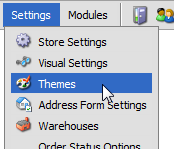
- Check for new themes
Click
- Confirm Theme Install
Your theme folder will be detected. Click the button to confirm theme installation.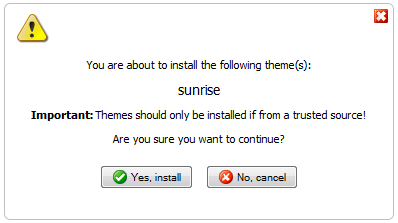
- Complete
You should see a message similar to this, showing that theme was installed: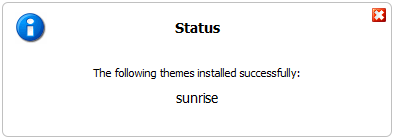
- Change theme to your custom theme
In order to see the changes you will be making to your custom theme, you will need to change to it. To do so, follow the instructions in the "Changing Your Current Theme" topic of the documentation. Please keep in mind that you will see no changes in the appearance of your store when you first create your new theme. If you wish to use your new theme as the default theme, you will need to set it as default by following the "Changing the Default Theme" topic.
© 2001-2010 Lighthouse Development. All Rights Reserved.